What Size Pot Does a ZZ Plant Need? (The Ultimate Guide)
Published on: January 11, 2026 | Last Updated: January 11, 2026
Written By: Lena Greenfield
Choosing the right pot size for your ZZ plant is one of the most important decisions you’ll make for its long-term health. Get it wrong, and you risk root rot or a stunted plant; get it right, and you’ll have a thriving, low-maintenance companion for years.
In this guide, I’ll walk you through everything from measuring your plant’s roots to my favorite pot materials, based on years of keeping ZZ plants happy in my own home. You’ll learn the ideal pot size, when and how to repot, pot material pros and cons, and the signs you’ve chosen perfectly.
Understanding Your ZZ Plant’s Pot Needs
I’ve kept ZZ plants for over a decade, and their pot preferences are wonderfully straightforward. ZZ plants have potato-like rhizomes underground that store water, which means they actually prefer to be a little snug in their pots. Giving them too much space is one of the few ways you can genuinely harm this tough plant.
A pot that’s excessively large holds more soil, and that extra soil stays wet for far too long. Your ZZ’s roots and rhizomes will sit in that dampness, which they absolutely hate. This is the primary cause of root rot. Think of it like wearing a well-fitting shoe versus a giant, sloshy boot-your ZZ plant performs best with the right amount of support and space.
Choosing the Perfect Pot Size
Selecting the right pot is less about strict rules and more about understanding the relationship between your plant and its home. You’re looking for a balance that promotes health without encouraging stress.
Measuring Your Plant for a New Pot
When it’s time to repot, I follow this simple, two-step process every single time. It has never failed me.
- Assess the Root Ball: Gently tip the plant out of its current pot. Look at the root system. Is it a tight, tangled mass circling the bottom and sides? If you see more roots than soil, it’s definitely time for an upgrade.
- The Goldilocks Rule: Your new pot should be only 1 to 2 inches larger in diameter than the old one. For example, if your ZZ is in a 6-inch pot, move it to an 8-inch pot. This small increase gives the roots just enough new territory to explore without drowning them in excess, wet soil.
Quick Tip: If you’re unsure, always err on the side of a pot that’s slightly too small rather than one that’s too large. A snug ZZ is a happy ZZ.
Standard Pot Size Recommendations
Based on the plants I’ve raised from tiny starters to lush floor specimens, here’s a reliable guide to what you’ll typically need.
- Starter Plant (4″ nursery pot): Perfect for a young plant with just a few stems. It can live here happily for a year or more.
- Medium Plant (6″ pot): This is the most common size for a mature, table-top ZZ plant you’d buy at a garden center.
- Large, Full Plant (8″ – 10″ pot): Ideal for a substantial, multi-stemmed plant that serves as a floor specimen. I rarely recommend going larger than a 10-inch pot unless your ZZ is truly a giant, as bigger pots dramatically increase the risk of overwatering.
I personally love using unglazed terra cotta pots for my ZZ plants. The porous clay allows the soil to dry out more evenly, giving you an extra safety net against over-loving your plant with too much water. Are terracotta pots good for indoor plants? They can be, especially for plants that prefer drier soil.
Picking the Best Pot Material
I’ve experimented with just about every pot material for my ZZ plants over the years, and I can tell you the choice impacts your watering schedule more than you might think. The absolute best pot is one with a drainage hole, no matter what it’s made of. Let’s break down your options. A ZZ plant care guide dives into watering, light, and soil requirements to keep them thriving. They work together with pot choice to dial in moisture and root health.
Plastic Pots
Plastic pots are lightweight and hold moisture well, which can be a blessing or a curse. I use them for many of my ZZs because they’re affordable and easy to move around. The key is to wait longer between waterings since the soil stays damp for more time. If you’re the type who loves to water your plants, a plastic pot might not be your best friend.
Ceramic & Terracotta Pots
These are my go-to for a more established, decorative look. Unglazed terracotta is porous, meaning water evaporates through the sides of the pot. This helps the soil dry out faster, which is fantastic for preventing overwatering. I often recommend terracotta for new plant parents because it provides a safety net against over-loving with the watering can. Glazed ceramic pots are less porous, so they hold water a bit longer, similar to plastic but with a sturdier, heavier base.
Quick Material Comparison
| Material | Best For | My Pro Tip |
|---|---|---|
| Plastic | Budget-friendly choices and lightweight needs | Wait for the soil to be completely dry before even thinking about watering. |
| Terracotta | Beginners and those who tend to overwater | Soak a new terracotta pot in water for an hour before use to prevent it from wicking all the moisture from your soil. |
| Glazed Ceramic | A stable, decorative finish | Ensure the pot has a drainage hole, as many decorative ones do not. |
Signs Your ZZ Plant Needs a New Pot
ZZ plants are slow growers and famously happy being a little snug, so how do you know when it’s truly time? I look for a combination of clues, not just one single thing. Here’s what has tipped me off over the years.
Is Your Plant Root Bound?
This is the most common reason for a upgrade. A root-bound plant has run out of room to grow. Here’s how to check:
- Gently wiggle the plant out of its pot. If you see a dense web of roots circling the outside of the soil ball, it’s time.
- Look for roots poking out of the drainage holes. A few are okay, but a thick mass is a cry for help.
- Notice if water runs straight through the pot without being absorbed. This means there’s more root than soil in there.
From my experience, a ZZ plant can stay perfectly happy in a root-bound state for a while, but its growth will eventually stall completely. Repotting a root-bound ZZ gives it a new lease on life and sparks a fresh burst of growth. If your plant is drooping or not growing, root-bound stress is a common culprit. Recognizing this helps explain why it’s not thriving and guides you toward repotting and refreshing the soil.
Is Your Pot Too Big?
This is a more dangerous, but less common, problem. I learned this the hard way with my first ZZ! A pot that is too large holds excess soil, which stays wet for far too long.
- Yellowing leaves, especially lower ones, are a classic sign of soggy soil and potential root rot.
- The soil still feels damp or cold a full week after you watered it.
- You might even see fungus gnats, as they love moist, decaying organic matter.
If you suspect your pot is too big, the best fix is to carefully downsize to a container that’s only 1-2 inches wider. Let the plant dry out thoroughly before you water it again in its new, cozier home.
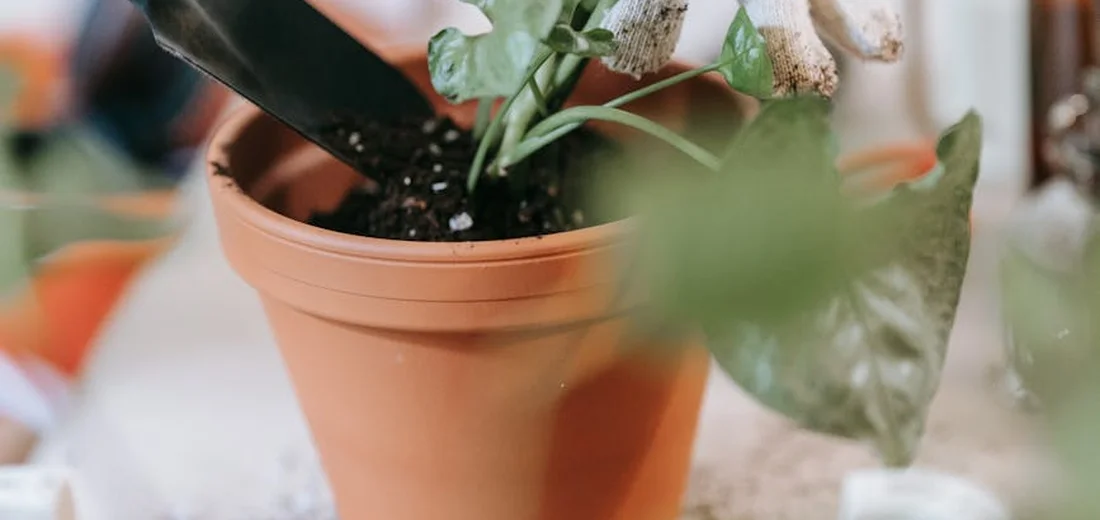
Your Step-by-Step Repotting Guide

I’ve repotted dozens of ZZ plants over the years, and the process is simple once you know the steps. Gently squeeze the sides of the nursery pot to loosen the root ball before you try to pull the plant out; this prevents a lot of unnecessary tugging and potential stem damage. Just be careful when handling the stems, especially if you’re pruning or maintaining your ZZ plant.
- Water your ZZ plant a day or two before repotting. A lightly hydrated plant is less stressed during the move.
- Lay down some newspaper or do this outside. It can get a little messy.
- Turn the pot on its side and carefully coax the plant out. If it’s stubborn, you can run a butter knife around the inside edge of the pot.
- Inspect the root ball. Look for any mushy, dark roots-these are signs of rot and should be snipped off with clean scissors.
- Place a layer of fresh, well-draining potting mix in the bottom of your new pot.
- Set your ZZ plant in the center. The top of the root ball should sit about an inch below the pot’s rim.
- Fill in around the sides with more soil, gently tamping it down to remove large air pockets.
- Wait about a week before you give it its first watering. This allows any minor root injuries to callus over, preventing rot.
A quick tip: After repotting, place your ZZ in a spot with bright, indirect light to help it recover and settle into its new home without the stress of direct sun. I always notice a growth spurt a few weeks after a successful repotting session.
The Ideal ZZ Plant Soil Mix
ZZ plants are tough, but they absolutely hate sitting in wet soil. Their potato-like rhizomes store water, making them prone to rot in heavy, moisture-retentive mixes. The single most important rule for ZZ plant soil is that it must be fast-draining. For the best soil mix ZZ plants thrive in, use a fast-draining blend. Common options include cactus/succulent mix or a potting soil base amended with perlite or pumice and a bit of orchid bark. I learned this the hard way with my first ZZ, which I planted in standard potting soil—it did not thrive.
My go-to homemade mix is simple and effective. I combine three parts of a regular indoor potting mix with one part perlite and one part coarse sand or orchid bark. This creates a chunky, airy environment that allows water to flow through quickly while still holding a little moisture for the roots. If you like DIY, you can adapt this base into your own succulent potting mix recipes. Try tweaking ratios or adding ingredients like pumice or cactus soil to customize drainage.
- Potting Mix: Provides the basic structure and some nutrients.
- Perlite: Those little white balls create essential air pockets and improve drainage dramatically.
- Coarse Sand or Orchid Bark: Adds grit and further prevents the soil from compacting over time.
If you don’t want to mix your own, look for a bagged succulent or cactus potting mix. Just be aware that some commercial cactus mixes can still be a bit dense, so I often add a handful of extra perlite to the bag to be safe. If you want a simpler option, you can use perlite succulent soil mixes, which are designed for quick drainage. They take the guesswork out of getting the right airy balance for ZZ plant roots. Your ZZ plant will reward you with steady, vibrant growth when its roots can breathe easily.
FAQs
What is a ZZ plant pot?
A ZZ plant pot is simply the container that houses the plant’s root system and soil.
What type of pot is best for a ZZ plant?
A pot with a drainage hole, such as unglazed terracotta, is best to help prevent overwatering.
How deep should a ZZ plant pot be?
The pot should be deep enough to allow the root ball to sit about an inch below the rim.
How can I tell if my ZZ plant is root-bound in its pot?
You will see a dense web of roots circling the soil ball or poking thickly from the drainage holes.
How do I know if my ZZ plant pot is too big?
The soil will remain damp for an unusually long time, increasing the risk of root rot.
What should I do if my ZZ plant is already potted?
If it is healthy and not root-bound, simply leave it in its current pot until it shows signs of needing more space.
Your ZZ Plant’s Perfect Home
Choose a pot that’s just 1-2 inches wider than the root ball, ensuring it has a drainage hole and is made of a porous material like terracotta. The right pot provides the snug, dry conditions your ZZ plant craves for healthy, vibrant growth. In its native tropical African habitat, ZZ plants grow in shaded areas with well-draining soil. At home, mirror those conditions with indirect light and infrequent watering.
- Snug fit prevents soggy soil.
- Drainage holes are non-negotiable.
- Porous materials help soil dry evenly.
You’ve got this! For more simple, experience-tested plant care tips that really work, keep exploring our guides. If you’re just starting out, here are essential indoor planting tips for absolute beginners—simple steps for light, watering, and soil. These basics cover light, moisture, and potting. Your thriving indoor jungle awaits.
Further Reading & Sources
- r/houseplants on Reddit: New ZZ plant! I need to repot as it’s rather top heavy. (Lime for scale)
- Full Size ZZ Plant
- When And How to Repot a ZZ Plant: A Step-by-Step Guide
- “ZZ” Plant – Cactus & Tropicals
Lena Greenfield is a passionate horticulturist and plant care expert with over 10 years of experience cultivating and nurturing hardy house plants. With a deep understanding of both indoor and outdoor gardening, Lena shares practical advice on choosing, caring for, and maintaining resilient plants that flourish year-round. Through her knowledge and hands-on approach, Lena helps plant lovers transform their spaces into vibrant, green sanctuaries, no matter their gardening experience.
Repotting Guidelines