How to Care for Plants After Repotting (Recovery Tips)
Published on: January 5, 2026 | Last Updated: January 5, 2026
Written By: Lena Greenfield
You just repotted your plant, and now it might look a little droopy or stressed-this is totally normal, and I’ve helped countless plants recover smoothly over the years.
I’ll walk you through my top tips for a healthy bounce-back, covering watering adjustments, light placement, soil monitoring, and stress signs.
Your First Crucial Steps After Repotting
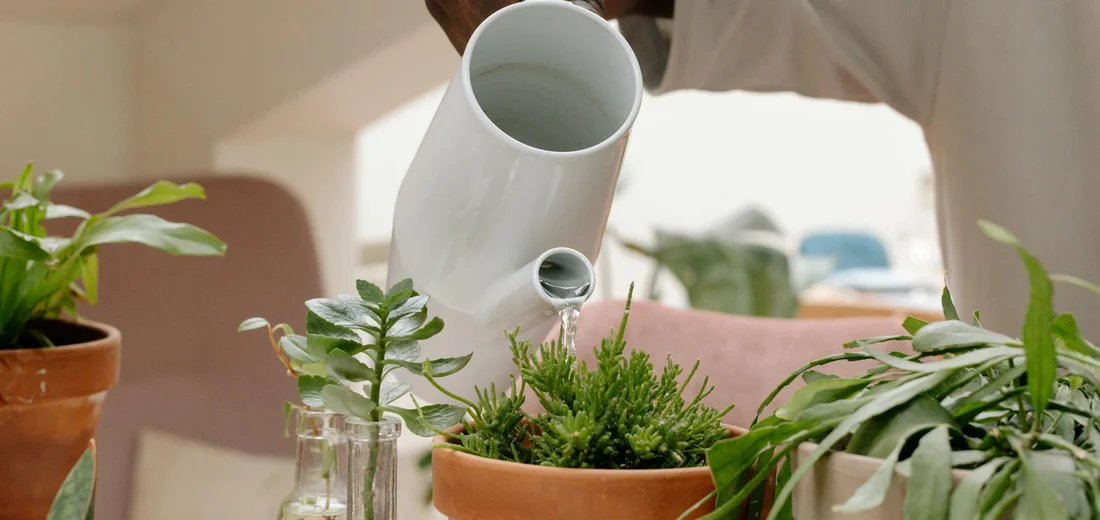
Your plant just had major surgery, and its root system is feeling vulnerable. My first move is always to give the plant a thorough, gentle watering, even if the new potting mix is slightly damp. This is called “watering in,” and it helps the fresh soil settle around the roots, eliminating air pockets that can dry them out.
I never use ice-cold water straight from the tap; it shocks the sensitive roots. Let your water sit out to reach room temperature first.
- Water slowly at the base of the plant until you see it running freely from the drainage holes.
- Resist the urge to fertilize for at least 4-6 weeks. Fresh soil has nutrients, and fertilizer can burn tender new roots.
- Place the plant back in its original spot if it was happy there. A sudden location change on top of repotting is too much stress.
Expect some drooping or a few yellow leaves-this is a normal sign of transplant shock. Your plant is just throwing a tiny tantrum as it adjusts.
Creating the Perfect Recovery Environment
Think of this period as your plant’s stay in a recovery spa. You are the concierge, and your job is to make its environment as stress-free as possible. Getting the light, humidity, and temperature right is how you ensure a swift and successful recovery. Watch for signs that humidity is off—dry leaf tips mean low humidity, while damp leaves suggest high humidity. Recognizing these cues helps you adjust to reduce humidity stress.
Why Light Adjustment is Non-Negotiable
After repotting, a plant’s ability to process intense light is temporarily reduced. I always move my repotted plants to a spot with bright, indirect light for at least a week, even if they are typically sun-worshippers. A north or east-facing window is perfect.
Direct sun, especially the hot afternoon kind, will scorch the leaves and force the plant to lose precious moisture through its leaves instead of focusing energy on root growth. For succulents, I pull them a few feet back from a south-facing window. They still get plenty of light, just without the harsh, direct beams. In hot summer months, this lighter exposure helps prevent sunburn and excessive moisture loss. Water deeply but allow the soil to dry between waterings.
The Role of Humidity in Root Health
Higher humidity is a secret weapon for recovery. When the air is more humid, the plant loses less water through its leaves, which reduces stress on the damaged root system. It’s like giving your plant a helping hand while it can’t drink efficiently on its own. To create the perfect recovery environment for a stressed plant, keep humidity steady and avoid temperature swings. Small adjustments like gentle misting and placing the pot away from cold drafts can help support recovery.
I don’t recommend misting, as it only raises humidity for a few minutes and can promote fungal issues. Here are the methods I actually use and trust:
- Group plants together: Plants naturally create a more humid microclimate when clustered.
- Use a pebble tray: Fill a shallow tray with pebbles and water, then place the pot on top (ensure the pot isn’t sitting in the water).
- Run a humidifier: This is the most effective method, especially for tropical plants recovering from a repot.
For most of my houseplants, I aim for a humidity level between 50-60% during their recovery phase. My succulents are the exception; they are perfectly happy with standard household humidity. Healthy succulents, meanwhile, do best with warmer daytime temperatures and relatively low humidity, with the soil drying out between waterings.
The Right Way to Water After Repotting
I’ve learned the hard way that your first instinct after repotting-to give your plant a giant drink-is often the wrong one. Fresh potting mix is usually lightly moist, and those roots need a moment to settle into their new home before a flood arrives. I wait a full day before that initial watering, giving any tiny root abrasions a chance to callus over.
Reading Your Plant’s Thirst Cues
Forget the calendar; your plant will tell you exactly what it needs. I rely on the good old finger test, sticking my index finger two inches down into the soil. If it feels cool and slightly damp, I walk away and check again tomorrow. If it’s dry and crumbly, it’s time for a slow, deep watering.
Succulents are a different story. Their thirst cues are visual! I wait until the soil is completely dry and the leaves feel just a little less firm when I give them a gentle squeeze. A soft, slightly wrinkly leaf is a succulent’s way of politely asking for a drink.
- The Finger Test: Insert your finger 2 inches deep. Water only if the soil feels dry.
- Observe Leaf Texture: For succulents, wait for a slight give or softness in the leaves.
- Water Slowly and Deeply: Pour water evenly around the soil until it runs out the drainage hole, then stop immediately.
- Empty the Saucer: Never let your plant sit in a puddle of drained water. This is a non-negotiable rule in my house.
Spotting and Solving Post-Repotting Problems
It’s normal for a plant to look a little sad and droopy for a few days-this is just “transplant shock.” But if the wilted, yellowing leaves persist for more than a week, something else is going on. The most common culprit I see is over-loving, which almost always means overwatering.
Dealing with the Dreaded Root Rot
I once nearly lost a beautiful pothos to root rot after repotting it into a pot that was far too large. The soil stayed wet for weeks, and a foul, swampy smell started coming from the pot. That unmistakable sour smell is your first major clue that root rot has set in.
If you suspect it, you have to act fast. Gently tip the plant out of its pot and brush away the soil to inspect the roots. Healthy roots are firm and white or tan. Rotten roots are mushy, dark brown or black, and will often fall apart in your hands.
- Remove the plant from its pot and gently wash the roots under lukewarm water.
- Using clean, sharp scissors, snip off every single soft, rotten root. Be ruthless.
- Soak the remaining healthy roots in a mixture of 1 part 3% hydrogen peroxide to 4 parts water for about 30 minutes. This helps kill any lingering fungus.
- Repot the plant into fresh, dry soil and a clean pot. Do not water for at least 5-7 days to let the roots recover.
Quick Tip: When you water after treating root rot, add a splash of hydrogen peroxide to your watering can to give the soil extra oxygen and discourage the rot from returning. After you’ve treated the rot, consider repotting the plant into fresh, well-draining soil in a clean pot to remove any remaining infected roots. This helps reset the plant and reduce the chance of relapse.
When and What to Feed a Recovering Plant
I’ve learned from experience that feeding a plant right after repotting is like offering a heavy meal to someone who just had surgery. The fresh potting mix already contains enough nutrients to sustain your plant for the next 4-8 weeks, so adding fertilizer now can overwhelm and chemically burn the delicate new roots. Your plant is focused on settling in, not on a growth spurt.
Wait until you see clear signs of new growth before you even think about fertilizer. A new leaf unfurling or a fresh stem poking through the soil is your green light. This usually happens about a month after repotting. For most leafy houseplants, I start with a half-strength dose of a balanced, water-soluble fertilizer to be extra gentle.
Special Care for Repotted Succulents
Succulents are tough, but they need a very specific approach after being moved. Their roots are exceptionally prone to rot if they get wet while healing from any repotting damage. The single most important rule for repotted succulents is to keep them completely dry for a significant period. I treat them entirely differently from my tropical plants. For newly propagated succulents, follow our care aftercare guide to support rooting and avoid overwatering. It walks you through drying times, light needs, and when to resume watering.
The Succulent Watering Wait
I cannot stress this enough: do not water your succulents immediately after repotting. I made this mistake early on and lost a beautiful echeveria to mush. Specifically, wait at least 5–7 days before watering after repotting. Only then should you water lightly and resume a normal schedule. Here is my proven method:
- Repot your succulent into dry, fresh succulent and cactus mix.
- Place the pot in a spot with bright, indirect light (no direct sun yet!).
- Wait a full 7 to 10 days before you even think about giving it a single drop of water.
This waiting period allows any tiny root abrasions to callous over and heal, creating a seal against moisture-borne fungi and bacteria. After the wait is over, give your succulent a thorough, deep watering until it runs out the drainage hole, then let it dry out completely again before the next drink. This cycle encourages the strong, deep root system they’re famous for.
Setting Up for Long-Term Success

Getting your plant settled into its new pot is just the first step. The real secret to a thriving plant is what you do in the weeks and months that follow. I’ve learned that a consistent, observant routine makes all the difference between a plant that merely survives and one that absolutely flourishes.
Mastering the Watering Shift
Your plant’s water needs will change after repotting. The fresh soil and potentially larger pot hold moisture differently. For the first few weeks, water a little more cautiously than you normally would. I always check the soil with my finger before reaching for the watering can. In our complete guide to watering your snake plant after repotting, you’ll learn exactly when and how much to water. This will help your plant settle in without risking root rot.
- Feel the Soil: Push your finger about two inches into the soil. If it feels dry, it’s time for a drink. If it’s still damp, wait another day or two.
- Water Deeply: When you do water, do it thoroughly. Pour slowly until you see water run out of the drainage holes. This encourages the roots to grow downward.
- Observe the Leaves: Droopy, soft leaves often mean too much water. Crispy, curling leaves usually mean not enough. Your plant will tell you what it needs.
When and How to Start Fertilizing
Hold off on the plant food! Most fresh potting mixes contain enough nutrients to sustain your plant for the first 4-8 weeks. Fertilizing too soon can overwhelm the sensitive roots and actually cause damage. I always mark my calendar for six weeks post-repotting before I even think about fertilizer.
- Wait 6 Weeks: Give your plant a full month and a half to settle in and recover from the move.
- Start with Half-Strength: When it’s time, use a balanced, water-soluble fertilizer diluted to half the recommended strength.
- Resume Normal Schedule: After this initial “welcome back” feeding, you can return to your regular fertilizing routine based on the plant’s needs and the season.
Strategic Pruning and Cleaning
A little grooming goes a long way in reducing stress on your plant. Gently wiping the leaves with a damp cloth removes dust and helps the plant breathe and absorb more light. This is a simple task I do every other week.
- Remove Damaged Growth: Use clean, sharp scissors to snip off any yellowing or dead leaves. This allows the plant to redirect its energy to new, healthy growth.
- Hold Off on Major Trims: Avoid heavy pruning or shaping for the first few months. Let the plant focus on its root system first.
The Art of Ongoing Observation
Your most important tool is your own eyes. Make it a habit to really look at your plant every few days, checking for subtle changes in leaf color, texture, and posture. I like to do this while I’m having my morning coffee-it’s a peaceful way to start the day and catch small issues before they become big problems.
Watch for new growth! The appearance of a fresh, tiny leaf is the ultimate sign that your plant is happy, settled, and ready for its new life in its new home. It’s the best reward for all your careful work.
Common Questions
What is repotted plant care?
Repotted plant care involves specific watering, light, and environmental adjustments to help a plant recover from the stress of being moved to a new pot.
Why is my plant drooping after I repotted it?
A slight droop is a normal sign of transplant shock as the plant redirects energy to re-establish its roots in the new soil.
How long does it take for a plant to recover from repotting?
Most plants will show signs of recovery and new growth within 1 to 2 weeks after repotting if given proper care.
Should I remove yellow leaves after repotting?
Yes, you should gently remove yellow leaves so the plant can focus its energy on growing new, healthy roots and foliage. You should remove yellow leaves when you notice they’ve yellowed, especially on older growth, to help redirect energy to healthy growth.
What is “red potted plant care”?
“Red potted plant care” likely refers to caring for a plant that is in a red-colored pot, which requires the same recovery steps but with extra attention to soil temperature as dark pots can heat up more in direct sun.
Can I put my repotted plant in direct sunlight?
No, you should place your repotted plant in bright, indirect light for at least a week to prevent additional stress and leaf scorch.
Your Plant’s Happy Recovery Roadmap
In my years of caring for house plants and succulents, I’ve learned that a successful recovery after repotting comes down to consistent, gentle care focused on watering, light, and patience. Stick to these simple steps, and you’ll see your plants perk up in no time. If you’re new to repotting succulents, here’s a quick beginner-friendly step-by-step guide to get you started. Follow along, and you’ll gain confidence as you go.
- Water only when the top inch of soil feels dry to avoid overwatering.
- Place plants in bright, indirect light to ease them into their new home.
- Hold off on fertilizing for a few weeks to let roots settle without stress.
Keep exploring Hardy House Plants at www.hardyhouseplants.com for more plant care wisdom, and don’t fret-your green pals are tougher than they look and will thrive with your loving attention.
Further Reading & Sources
- Complete guide to repotting | Patch
- Repotting Plants: Basics Beginning Gardeners Need To Know
- How to Repot a Plant – Seattle’s Favorite Garden Store Since 1924 – Swansons Nursery
- Repotting 101: A Comprehensive Guide to Rejuvenate Your Houseplants
Lena Greenfield is a passionate horticulturist and plant care expert with over 10 years of experience cultivating and nurturing hardy house plants. With a deep understanding of both indoor and outdoor gardening, Lena shares practical advice on choosing, caring for, and maintaining resilient plants that flourish year-round. Through her knowledge and hands-on approach, Lena helps plant lovers transform their spaces into vibrant, green sanctuaries, no matter their gardening experience.
Repotting Guidelines