What Does a Healthy ZZ Plant Look Like? A Visual Identification Guide
Published on: January 30, 2026 | Last Updated: January 30, 2026
Written By: Lena Greenfield
Worried your ZZ plant might not be thriving? I’ve been there, staring at mine, unsure if it’s just slow-growing or genuinely happy. A healthy ZZ plant has specific, cheerful visual traits that are easy to spot once you know what to look for.
Drawing from my years of nurturing these hardy plants, I’ll show you the telltale signs. This guide covers: leaf shine and color, stem strength and posture, new growth patterns, soil and root clues, and early warning signs of trouble.
The Picture of Health: Key Visual Traits of a Thriving ZZ Plant
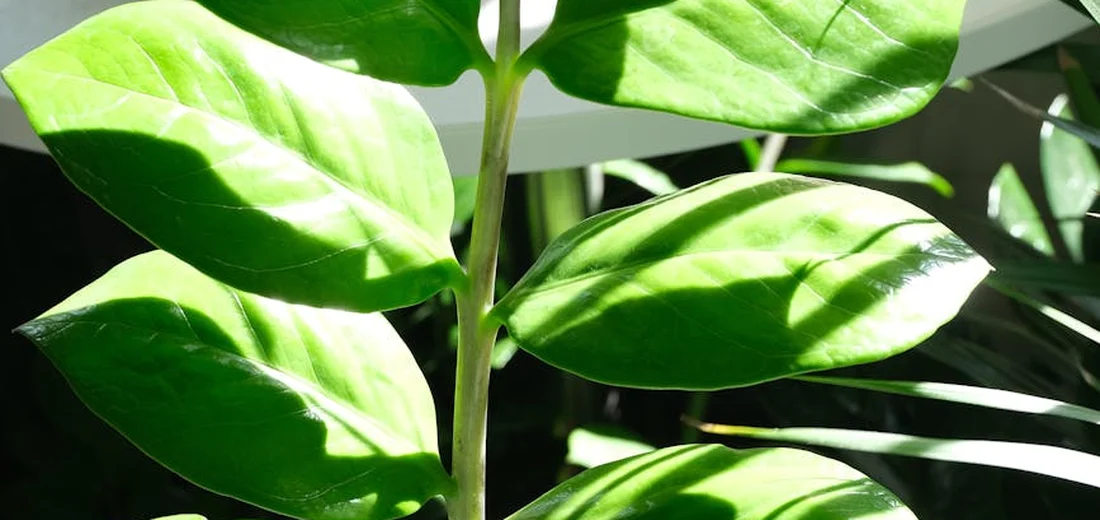
Leaf Luster and Color
When I look at a happy ZZ plant, the first thing I notice is how the leaves shine. Healthy ZZ plant leaves have a natural, waxy gloss that makes them look polished and vibrant. They reflect light beautifully, almost like they’ve been lightly buffed. In my experience, this sheen is a sure sign the plant is well-hydrated and absorbing nutrients efficiently.
The color should be a consistent, deep emerald green across the entire leaf surface. Varieties like the ‘Raven’ ZZ will have leaves that start lime green and mature to a dramatic, nearly black hue, which is completely normal. I’ve seen leaves lose their luster and turn dull or pale when the plant needs more indirect light or a sip of water. Yellowing or brown spots are your plant’s way of whispering for help.
Run your finger gently over a leaf. It should feel smooth and sturdy, not thin or papery. If you see dust building up, a quick wipe with a damp cloth not only helps it photosynthesize better but also restores that gorgeous shine I love.
Stem and Growth Structure
ZZ plant stems are architectural wonders. A robust stem feels firm to the touch and stands upright with a graceful, slight arch at the top where the leaves cascade. They should be a uniform, pale green to brownish color, which is just their natural, cork-like texture. I’ve had stems that grew a bit leggy and leaned toward a window; rotating the pot every few weeks encourages even, balanced growth.
The overall structure should look full and symmetrical. New stems emerging at different points create a pleasing, bushy appearance rather than a single, sparse stalk. If your plant looks lopsided, don’t worry-it’s an easy fix with strategic placement or by propagating a stem to fill the gap.
The Look of New Shoots
Spotting a new shoot is always a thrill. Healthy new growth emerges as a tightly furled, bright green spike that pushes up from the soil near the base of the plant. It might look like a pale, pointed cone at first. In my care, these shoots can seem to appear overnight after a good watering during the growing season.
As it unfurls, the new stem will be a lighter, fresher green than the mature ones, and the tiny leaves will be soft. Be patient, as ZZ plants are slow growers; that new shoot might take weeks to fully open and darken to its deep green color. I never force or tug on them, as they’re delicate and will mature at their own perfect pace.
Below the Soil: Inspecting Roots and Rhizomes for Health
What Healthy ZZ Plant Roots Look Like
When you gently lift the plant from its pot for a check-up, healthy roots tell a clear story. They should be firm and a creamy white or light tan color, spreading out from the base of the rhizomes. I recall repotting my first ZZ and being delighted by the dense, web-like network of roots-it showed the plant was actively anchoring itself and seeking nutrients.
The roots should feel substantial, not brittle or slimy. A healthy root system will hold the soil together in a loose ball but shouldn’t be a tightly wound, constricted mass circling the pot. If you see a few roots peeking out of the drainage holes, it’s likely time for a slightly larger home, but ZZ plants enjoy being a bit snug.
Identifying Healthy Tuberous Rhizomes
Beneath the soil, the ZZ plant’s secret weapon is its rhizomes-those potato-like storage organs. Healthy rhizomes are plump, firm, and have a smooth, tan or brown skin without any soft, mushy spots or black discoloration. I think of them as the plant’s personal water reservoirs, which is why ZZ’s are so drought-tolerant.
When inspecting, you might find several clustered together. Each healthy rhizome should feel heavy for its size and may even have small, budding growth points where new shoots will eventually form. In my experience, if a rhizome feels squishy or smells unpleasant, it’s a sign of overwatering and rot, which requires immediate action to save the plant.
Here’s a quick list of what to feel for in healthy rhizomes:
- Firm, dense texture like a fresh potato.
- Uniform color without dark patches.
- No wrinkles or shriveled appearance, which indicates dehydration.
The Warning Signs: Visual Cues of an Unhealthy ZZ Plant

Yellowing Leaves: Overwatering’s Calling Card
Spotting yellow leaves on your ZZ plant is a clear signal it’s getting too much water. In my years of caring for these plants, I’ve learned that yellowing usually starts at the lower leaves and works its way up when the roots are suffocating in wet soil. Feel the soil with your fingers; if it’s consistently damp or has a musty smell, you need to cut back on watering immediately. Even indoors, ZZ plants don’t like frequent watering. They store water in their rhizomes and prefer to dry out between waterings.
I once rescued a ZZ by repotting it into a dry, well-draining mix after noticing widespread yellowing. Common causes of yellowing and brown tips in ZZ plants include overwatering, poor drainage, or insufficient light. Identifying the specific cause lets you apply the right solution—adjust watering, improve drainage, and provide bright, indirect light. Acting fast can save the plant, as ZZ stems store water and can recover once the soil dries out completely. Let the top inch of soil become bone-dry between waterings to keep those leaves a happy green.
Brown Tips and Leaf Edges
Brown, crispy tips on ZZ leaves often stem from dry air or chemical buildup in your water. From my experience, using tap water high in fluoride or chlorine is a common culprit, especially in drier climates. I switch to filtered or rainwater for my plants, and it makes a noticeable difference in leaf health. ZZ plants are often cited as science-backed air purifiers. Keeping them healthy helps maximize their air-cleaning potential.
Another quick tip: brown edges can also indicate salt accumulation from fertilizers. Every few months, I thoroughly flush the soil by running water through the pot until it drains clear, preventing those unsightly tips. It’s a simple habit that keeps leaves looking sleek and vibrant.
Stems Gone Wrong: Drooping and Legginess
Drooping ZZ stems are a red flag for overwatering, similar to yellow leaves, because root rot weakens their support. I’ve seen stems go from perky to slumped in days if the soil stays too wet, so always check moisture levels before reaching for the watering can. If stems feel mushy, it’s time to inspect the roots and possibly repot. If your ZZ isn’t growing and is drooping or falling over, it’s often tied to water stress and root damage. Improving drainage, allowing proper drying between waterings, and providing bright indirect light can help it recover and start growing again.
Leggy growth, with long stems and sparse leaves, happens when your ZZ isn’t getting enough light. While ZZ plants tolerate low light, they prefer bright, indirect sunlight to stay compact and full—I move mine near an east-facing window for best results. A little adjustment here can prevent that stretched-out, awkward look. In its tropical native habitat, ZZ plants thrive under a forest canopy with filtered light. Understanding these growing conditions can help you recreate them at home, keeping the plant compact and healthy.
Your At-Home Health Assessment: A Step-by-Step Check
Performing a regular health check on your ZZ plant helps you catch issues early and keep it thriving. I do this monthly based on my routine with dozens of plants, and it only takes a few minutes for peace of mind. Pruning is a key part of maintaining ZZ plants; when needed, trim back leggy stalks and remove discolored leaves to keep the plant tidy and healthy. If pruning is needed, the best approach is to trim just above a healthy growth node with clean, sharp shears. Follow these steps to assess your plant’s condition.
- Start with the leaves: Look for a consistent, deep green color without spots or discoloration. Gently touch them; healthy leaves feel firm and waxy, not soft or brittle.
- Inspect the stems: They should stand upright and feel sturdy. Note any leaning, mushiness, or unusual softness, which could signal overwatering or damage.
- Test the soil moisture: Insert your finger about two inches into the soil. If it feels damp, wait to water. ZZ plants love dryness, so err on the side of underwatering.
- Check the pot and drainage: Ensure the pot has holes at the bottom and no standing water in the saucer. Good drainage is critical to prevent root rot.
- Evaluate light exposure: Observe if the plant is in a spot with bright, indirect light. If it’s in deep shade, consider relocating it to a brighter area to avoid legginess.
- Look for new growth: Healthy ZZ plants produce new shoots periodically. Seeing fresh, green stems is a great sign your care routine is working.
This straightforward assessment has helped me nip problems in the bud for years. Keep a plant journal or take photos to track changes over time, making it easier to spot trends and adjust your care.
Cultivating Vitality: Simple Care for a Lasting Healthy ZZ Plant

Mastering the Watering Rhythm
I learned the hard way that ZZ plants hate wet feet. My first ZZ suffered from root rot because I watered it like my ferns. Treat your ZZ plant like a succulent—water only when the soil is completely dry, about every 3-4 weeks in most homes. For the best soil mix ZZ plants thrive in, choose a well-draining, gritty blend. A simple recipe is 1 part potting mix, 1 part perlite, 1 part orchid bark. Stick your finger two inches into the soil; if it feels dry and crumbly, it’s time for a drink.
Give it a thorough soak until water runs out the drainage holes, then let all excess water drain away. This deep watering method encourages strong root growth and prevents the stems from becoming soft or mushy. In winter, I often stretch watering to every 6-8 weeks since the plant is resting.
Finding the Sweet Spot for Light
ZZ plants are champions of low light, but they truly shine with a bit more brightness. Mine in a dim corner survives, but the one near a sheer-curtained window pushes out new shoots twice as fast. Place your ZZ in a spot with bright, indirect light for the fastest growth and richest leaf color.
Avoid harsh, direct afternoon sun, which can scorch those beautiful leaves, causing pale or brown patches. If you only have low light, don’t worry-your ZZ will adapt, just expect slower growth and water it less frequently. I rotate my plant a quarter turn each month to keep growth even.
Soil and Potting Fundamentals
The right soil mix makes all the difference. I use a cactus and succulent potting mix and add a handful of perlite for extra drainage. Your goal is a loose, airy soil that drains quickly and doesn’t hold onto moisture for long. Heavy, dense potting soil stays wet too long and is a common cause of root problems.
Choose a pot with drainage holes-this is non-negotiable for healthy roots. When repotting, which I do every 2-3 years, only go up one pot size. A pot that’s too large holds excess soil that stays wet, risking root rot. Here’s my simple repotting checklist:
- Gently remove the plant and shake off old soil.
- Check the rhizomes (those potato-like lumps at the base); they should be firm and creamy-white.
- Place in the new pot with fresh mix, filling gaps without packing too tightly.
- Wait a week before watering to let any disturbed roots heal.
Choosing Wisely: How to Pick a Healthy ZZ Plant from the Start
Starting with a vigorous plant sets you up for success. When I’m at the nursery, I always inspect a few key areas. Look for firm, upright stems that don’t bend or wobble easily-they should feel sturdy like a pencil. The leaves ought to be a deep, glossy green without any yellow edges or brown spots.
Gently brush the leaves to check for pests like spider mites or mealybugs; I once brought home a plant with scale and had to treat it for weeks. If you can, peek at the roots by tipping the plant slightly; healthy roots are light-colored and firm, not dark or slimy. Avoid plants with a musty smell, as this can indicate rot.
Here’s a quick visual guide for your shopping trip:
- Stems: Thick, rigid, and free of wrinkles or soft spots.
- Leaves: Uniformly green, shiny, and densely packed along the stem.
- Soil: Should be dry to the touch, not soggy or moldy.
- Pot: Check for roots growing out of drainage holes, which means it’s pot-bound and may need repotting soon.
Choosing a plant with compact, balanced growth often means it’s been well-cared for in the greenhouse. Don’t hesitate to ask the store staff about their watering schedule-it tells you a lot about their plant care practices.
FAQs
What are the key visual traits of a healthy ZZ plant?
Glossy, deep green leaves and firm, upright stems indicate a thriving plant.
What do healthy ZZ plant roots look like?
Healthy roots are firm, creamy white to light tan, and form a loose network in the soil.
How can I identify unhealthy ZZ plant roots?
Unhealthy roots are often dark brown or black, mushy to the touch, and may have a foul odor.
What characterizes a healthy ZZ plant rhizome?
A healthy rhizome is plump, firm, and has smooth, tan or brown skin without soft spots.
Are ZZ plant roots healthier in wet or dry soil?
ZZ plant roots are healthiest in dry soil, as overwatering quickly leads to rot and decay.
Is slow growth a sign of an unhealthy ZZ plant?
Slow growth is normal for ZZ plants and not necessarily a sign of poor health if other visual cues are positive.
Your Healthy ZZ Plant Checklist
In my years of collecting, a thriving ZZ Plant always shows off firm, upright stems, glossy deep-green leaves, and a habit of steady, controlled growth. For a quick health scan, just remember its three core needs: plenty of bright, indirect light; a thorough drink only when the soil is completely dry; and a snug pot that isn’t oversized (the right size for ZZ plants).
Now that you know exactly what to look for, go give your own ZZ a once-over with fresh, confident eyes. Trust what you see—your plant will tell you everything you need to know, and with this guide, you understand its language. In this ZZ plant care guide, you’ll learn about watering, light, and soil requirements. Apply these basics and your ZZ will thrive. You’ve got this, and your resilient green friend is rooting for you.
Further Reading & Sources
- ZZ Plant (Zanzibar Gem) Growing & Care Tips
- The Sill | How To Care for a ZZ Plant
- ZZ Plant Guide: Easy Grow & Care Tips for Healthy Foliage
- ZZ Plant Care: How To Care for Zamioculcas Zamiifolia
Lena Greenfield is a passionate horticulturist and plant care expert with over 10 years of experience cultivating and nurturing hardy house plants. With a deep understanding of both indoor and outdoor gardening, Lena shares practical advice on choosing, caring for, and maintaining resilient plants that flourish year-round. Through her knowledge and hands-on approach, Lena helps plant lovers transform their spaces into vibrant, green sanctuaries, no matter their gardening experience.
Stress Symptoms