How to Revive a Dying Pothos Plant
Published on: January 27, 2026 | Last Updated: January 27, 2026
Written By: Lena Greenfield
If your pothos is drooping, yellowing, or losing leaves, you’re likely searching for a way to save it fast. You might be worried that you’ve overwatered it or that it’s not getting enough light, but I’ve brought many pothos plants back from the brink.
Drawing from my years of tending indoor plants, I’ll guide you through a clear revival plan, covering identifying the root cause, correcting watering habits, optimizing light exposure, and effective pruning methods.
Identifying the Problem: Common Symptoms of a Struggling Pothos
Yellowing Leaves and What They Signal
When I see a pothos leaf turn yellow, my first instinct is to check the soil’s moisture with my finger. Yellow leaves are the plant’s most common cry for help, and they usually point straight to a watering issue. If the soil feels soggy and clings to your skin, you’re likely giving it too much love with the watering can. The roots are suffocating. If the soil is bone-dry and pulling away from the pot’s edges, your plant is parched and shedding old leaves to survive.
I once rescued a pothos from a friend’s office where every single leaf was a pale, sickly yellow. A quick tip: consistent yellowing across many leaves often means overwatering, while yellowing on older, lower leaves first can signal underwatering. Don’t just look at the leaf; investigate the soil and the roots to get the full story.
Wilting, Curling, and Drooping Leaves
Limp, droopy leaves that have lost their perky posture are telling you they don’t have the water pressure to stay upright. Wilting is a dramatic sign of thirst, but it can also happen if the roots are too damaged from rot to absorb water. I see leaves curl inward, like they’re trying to conserve every last drop of moisture, when I’ve forgotten to water my hanging pothos for too long.
Touch the leaves. If they feel thin and papery, your plant needs a long, deep drink. If the soil is wet and the leaves are still droopy and soft, you’re likely dealing with advanced root rot. The roots are so damaged they can’t deliver water to the leaves, leaving the plant dehydrated even in damp soil.
Brown Leaf Tips and Spots
Crispy brown tips on your pothos leaves are usually a sign of low humidity or a buildup of salts and minerals from tap water. My pothos in the bathroom, with its steamy showers, never gets brown tips, while the one by my sunny window sometimes does. If you see isolated brown spots surrounded by a yellow halo, that can be a sign of a fungal issue often brought on by leaves staying wet for too long.
Large, dry, brown patches on the leaves, especially ones facing the window, are classic sunburn or other light-related issues. Pothos love bright, indirect light, but direct sun rays are too intense and will literally scorch their beautiful leaves. I learned this the hard way after moving a plant to a “sunny spot” and finding it covered in bleached, crispy marks within days.
Uncovering the Root Cause: Why Your Pothos is Dying
The Perils of Overwatering and Root Rot
This is the number one killer of pothos plants, and I’ve been guilty of it myself. Overwatering doesn’t mean you gave it too much water at once; it means the soil stays wet for too long, suffocating the roots. Healthy pothos roots are firm and white or orange. Rotten roots are mushy, dark brown or black, and often smell foul.
If you suspect overwatering, you must act fast. Gently take the plant out of its pot and feel the roots-if they squish between your fingers, it’s time for some surgery. Use clean scissors to cut away all the rotten parts, then repot your pothos in fresh, well-draining soil. I always mix in extra perlite to my potting mix to ensure water flows through quickly.
The Silent Threat of Underwatering
While overwatering is a swift killer, underwatering is a slow, stressful decline. Your pothos is a survivor and can handle some neglect, but consistent thirst will cause it to drop leaves, stunt its growth, and lose its vibrant color. The entire plant will look tired and dull, not just a single leaf.
The best fix is a thorough, deep watering. I place my parched pothos in a sink or bowl and pour water slowly over the soil until it runs freely out the drainage hole, ensuring the entire root ball gets hydrated. Then I let it drain completely before putting it back in its spot. You’ll often see the leaves perk up within hours.
Lighting Issues: From Scorched to Starved
Pothos are adaptable, but they have a goldilocks zone for light. Too much direct sun burns leaves, while too little light causes leggy growth with large gaps between leaves as the plant desperately stretches for a light source. The vibrant variegation on varieties like Marble Queen will also fade to a solid green in low light. Knowing what are the light and temperature needs for pothos plants helps you place them in the right spot.
In my home, I’ve found the perfect spot is in front of a north or east-facing window, or several feet back from a south or west window. A quick tip: if your pothos isn’t putting out any new growth for months, it’s probably not getting enough light to fuel its basic functions. Move it to a brighter location and watch for a new leaf to unfurl-it’s the best sign of recovery.
Your Action Plan: Step-by-Step Guide to Revive Your Pothos
Step 1: The Triage and Pruning Phase
First, grab a pair of clean, sharp scissors and your pothos. I always start by removing all the clearly dead or yellow leaves-this immediately stops the plant from wasting any more energy on them. Look for stems that are brown, mushy, or completely leafless and snip those off too. Don’t be shy here; a good haircut encourages fresh, new growth from the base.
Step 2: The Root Inspection and Soil Assessment
Gently tip the plant out of its pot. Healthy pothos roots are firm and white or light tan, while rotten roots are dark brown, mushy, and often smell bad. Use your fingers to carefully loosen the root ball and shake off the old soil. This is your chance to see what’s really going on beneath the surface. If the soil is compacted, soggy, or has a foul odor, you’ve found a big part of the problem.
Step 3: Addressing Root Rot and Repotting
If you find root rot, it’s surgery time. With your clean scissors, cut away every single soft, rotten root until you’re left with only firm, healthy ones. I like to mix my own well-draining soil for this: two parts regular potting mix, one part perlite, and a handful of orchid bark for extra aeration. Choose a pot with drainage holes that’s only an inch or two larger than the remaining root ball. A pot that’s too big holds excess water and can cause the rot to return. Proper repotting techniques are crucial for helping your plant recover.
- Place a layer of fresh soil in the bottom of the new pot.
- Position your pothos inside and fill in around the roots with your new soil mix.
- Gently firm the soil around the base-no need to pack it down tightly.
Step 4: Resetting Your Watering Routine
After repotting, give your plant a thorough, gentle watering until it runs out the drainage holes, which helps settle the new soil around the roots. The best way to know when to water next is the finger test: stick your finger two inches into the soil, and only water when it feels dry at that depth. I’ve learned that pothos prefer to dry out a bit between drinks rather than staying constantly wet. In indoor settings, where air can be drier, pothos often require a touch more frequent watering. This simple check prevents both overwatering and underwatering.
The Propagation Safety Net: Saving Pothos Cuttings
Even if the main plant doesn’t make it, you can almost always save parts of it. Propagation is like a life insurance policy for your pothos, and I’ve started new plants from cuttings I was sure wouldn’t survive. It’s a fantastic way to turn one struggling plant into multiple healthy ones. If you’re curious how to do it, here’s a complete step-by-step guide to propagating pothos plants. Follow along to learn the exact steps, from choosing cuttings to rooting and care.
How to Take and Root Healthy Cuttings
Look for the healthiest-looking green vines, even if they’re on a sad-looking plant. Using clean shears, snip a 4-6 inch piece of stem, making sure each cutting has at least one leaf and one node-that little brown bump on the stem where roots grow from. You can root these cuttings in water or directly in moist soil.
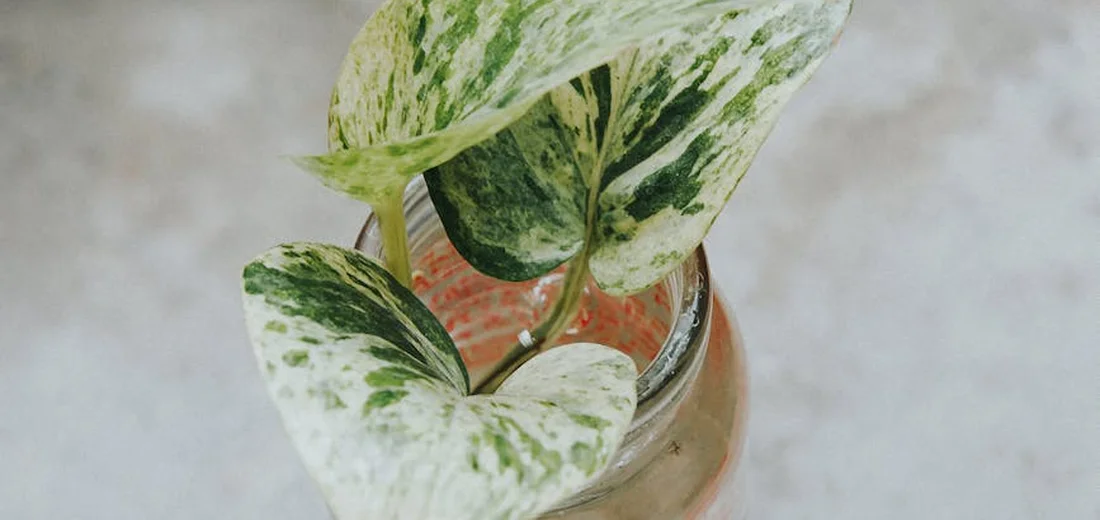
- Water Method: Place the cuttings in a jar of water, ensuring the node is submerged but the leaf is not. Put it in bright, indirect light and change the water once a week. You’ll see tiny white roots in a few weeks.
- Soil Method: Push the node-end of the cutting into a small pot of moist potting mix. Keep the soil lightly damp and tent a clear plastic bag over the pot to create humidity. New growth is a sign it has rooted.
Quick tip: A clear glass jar lets you watch the roots grow, which is half the fun! Once the roots are an inch or two long, you can pot them up into their own container.
Keeping Your Pothos Thriving: Long-Term Care Essentials
Once you’ve pulled your pothos back from the brink, the real work begins: keeping it happy and growing. I’ve found that consistent, simple routines are far more effective than frantic, last-minute care. This is where your plant will truly start to flourish again.
Mastering the Watering Schedule
Forget setting a calendar reminder for watering. Your pothos will tell you exactly when it’s thirsty. The best method I’ve ever used is the simple “finger test”-I stick my index finger about two inches into the soil. If it feels dry, it’s time for a drink. If it’s still damp, I walk away and check again in a few days. That same finger test works for succulents too. They’ll show thirst with wrinkled leaves and a dry top layer of soil.
When you do water, do it thoroughly. Take your plant to the sink and water it slowly until you see liquid running freely out of the drainage hole. This ensures the entire root ball gets moistened, encouraging strong, deep roots. Let the pot drain completely before placing it back in its decorative cover or saucer. A plant sitting in a puddle is a one-way ticket back to root rot city.
- The Soak-and-Dry Method: Water thoroughly, then wait until the top few inches of soil are dry before watering again. This is the golden rule for pothos.
- Seasonal Shifts: Your plant will drink much less in the winter when growth slows down. I often water mine half as frequently during the colder, darker months.
- Pot Material Matters: Plants in porous terracotta pots dry out faster than those in plastic or glazed ceramic. Adjust your checking frequency accordingly.
Finding the Perfect Light and Location
Pothos are famously adaptable, but they have a sweet spot. In my home, the happiest pothos are the ones that receive plenty of bright, indirect light. I place them near an east-facing window where they get gentle morning sun, or a few feet back from a south or west window where the harsh rays can’t scorch their leaves. The same idea applies when selecting indoor plants—match their light needs to your home’s conditions. If a room has low light, opt for varieties that thrive in shade.
You can tell a lot about your plant’s light situation by looking at its leaves. If the beautiful variegation on a Golden Pothos starts to fade and the leaves turn solid green, it’s begging for more light. Conversely, if the leaves are pale, washed-out, or have brown, crispy patches, it’s likely getting too much direct sun.
- Observe the Shadows: Hold your hand over the spot where the plant sits. A soft, blurry shadow means perfect indirect light. A sharp, defined shadow means the light is too direct.
- Rotate for Balance: Give your pot a quarter-turn every time you water. This prevents the plant from leaning and growing lopsided as it reaches for the light.
- No-Natural-Light Solution: If you have a dark room, don’t despair! A Marble Queen or Jade Pothos will tolerate lower light better than a highly variegated type. You can also supplement with a simple grow light for a few hours a day.
Simple Feeding and Pest Prevention
Feeding your pothos is like giving it a multivitamin, not a full meal. I use a balanced, water-soluble houseplant fertilizer diluted to half-strength, and only during the active growing season (spring and summer). I feed mine about once a month, and I always make sure the soil is damp before fertilizing to avoid burning the roots, especially when addressing nutrient deficiencies like phosphorus deficiency for healthier blooms and roots.
During fall and winter, I stop fertilizing completely. The plant is resting, and forcing new growth with nutrients when light levels are low can lead to weak, spindly vines. The best time of year to fertilize indoor plants is spring and early summer, when they’re actively growing. Use a diluted fertilizer to avoid overfeeding.
Pests are rare on a healthy pothos, but they can attack a stressed plant. The most common culprits I’ve encountered are mealybugs (they look like tiny bits of cotton) and spider mites (you might see fine webbing). Catching them early is key.
- Regular Check-ups: When I water, I quickly inspect the undersides of leaves and where the leaf meets the stem-pests love to hide there.
- First Line of Defense: For a small infestation, I wipe the leaves with a cotton ball dipped in rubbing alcohol. It’s a simple, effective household fix.
- For Stubborn Cases: A gentle spray of insecticidal soap or neem oil solution, applied weekly, usually takes care of the problem. I always test a small area first to ensure the leaves aren’t sensitive.
A quick, monthly leaf wipe-down with a damp cloth does double duty. It not only keeps pests at bay but also removes dust, allowing the leaves to breathe and absorb more light for photosynthesis. So, what’s the best method for cleaning indoor plant leaves? For most houseplants, a gentle wipe with lukewarm water and a soft microfiber cloth is effective.
FAQs
Can I revive a pothos by placing it in water instead of soil?
Yes, you can revive a pothos by propagating healthy cuttings in water, but it is not ideal for long-term growth of an entire plant.
What is a sign that my pothos is starting to recover?
New leaf growth indicates that your pothos is responding well to revival efforts and is on the path to recovery.
How can I increase humidity to help revive my pothos?
Increase humidity by misting the leaves regularly or placing the pot on a tray filled with water and pebbles.
Is it possible to revive a pothos that has lost all its leaves?
Yes, a pothos can regrow leaves if the stems and roots are still healthy and it receives proper care.
What should I do if my pothos is in a pot without drainage holes?
Repot the pothos into a container with drainage holes to avoid water accumulation and root rot.
Are there any quick fixes for reviving a pothos recommended by plant communities?
No quick fixes exist; successful revival depends on correctly diagnosing the issue and maintaining consistent care.
Your Pothos Revival Success Story
From my experience, bringing a pothos back to health hinges on pinpointing the issue-often related to water, light, or soil-and taking swift, simple actions. Focus on these core steps to turn things around:
- Check soil moisture and adjust watering to prevent over- or underwatering
- Provide bright, indirect light and prune dead leaves to spur new growth
- Repot in fresh, well-draining soil if root rot is suspected
Stick with these basics, and you’ll likely see your pothos perk up in no time. For ongoing support and more plant care insights, follow along on our website-you’re doing great, and your green thumb is growing stronger every day!
Further Reading & Sources
- How Can You Tell If A Golden Pothos Is Dying?
- 10 Reasons Your Pothos Plant is Dying (And How to Revive it)
- r/pothos on Reddit: How can I revive my severely neglected pothos?
- Is Your Pothos Plant Dying? Here Are 8 Potential Reasons Why (and How to Save It)
Lena Greenfield is a passionate horticulturist and plant care expert with over 10 years of experience cultivating and nurturing hardy house plants. With a deep understanding of both indoor and outdoor gardening, Lena shares practical advice on choosing, caring for, and maintaining resilient plants that flourish year-round. Through her knowledge and hands-on approach, Lena helps plant lovers transform their spaces into vibrant, green sanctuaries, no matter their gardening experience.
Stress Symptoms