How to Grow Succulents on Driftwood: A Simple Guide
You want to create a stunning succulent display on driftwood, but you’re worried about how to attach the plants securely and keep them alive. I’ve made plenty of these living sculptures over the years, and it’s easier than you think once you know the simple steps.
In this guide, I’ll walk you through my exact process for creating a thriving succulent-on-driftwood centerpiece, covering choosing the right driftwood, selecting the best succulents, preparing your materials, attaching plants securely, and providing long-term care.
Why Create a Driftwood Succulent Display
Creating a driftwood succulent display transforms a simple hobby into living sculpture for your home. You’re not just potting a plant; you’re building a miniature, self-contained landscape that tells a story of nature’s resilience. I have a piece in my sunroom that consistently gets more comments than any expensive art I own-guests are fascinated by how life springs from weathered wood.
These displays are incredible space-savers, perfect for small apartments or crowded windowsills. By growing vertically on driftwood, you free up precious horizontal surface area while adding a stunning focal point to any room. The natural curves and holes in the wood provide perfect, ready-made pockets for your succulents to nestle into, creating a look that feels utterly organic and intentional at the same time.
Gathering Your Driftwood Succulent Supplies
Getting the right materials from the start makes the entire process smooth and enjoyable. Think of this like gathering ingredients for a special recipe-quality components lead to a masterpiece. Based on my many projects, here is your essential checklist.
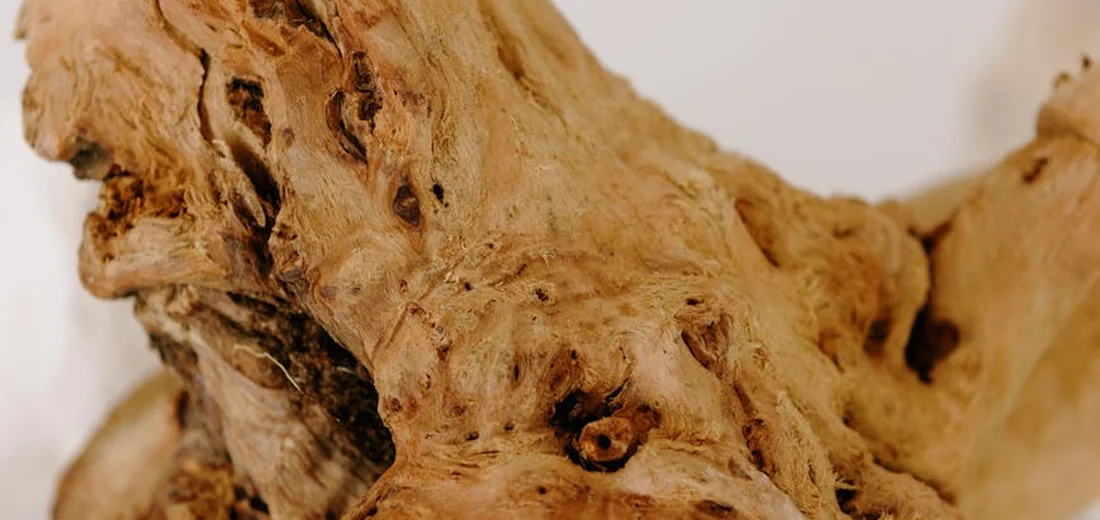
The Perfect Piece of Driftwood
- Size & Shape: Choose a piece that speaks to you! Look for interesting textures, nooks, and crannies. A piece between 12 to 24 inches is a great, manageable size to start with.
- Texture & Holes: Prioritize wood with natural indentations, grooves, or small holes. These become perfect planting pockets without you having to drill extensively.
- Wood Type: Hardwoods like manzanita or cholla wood are fantastic as they resist rot. I’ve had great luck with grapewood, but it can be a bit more fragile.
- Cleanliness: Always source driftwood that is clean and dry. If you forage it yourself, scrub it with a brush and water (no soap!) and bake it in the oven at 200°F for an hour to kill any pests.
Your Succulent Selection
- Shallow Roots are Key: Pick succulents that don’t need deep soil. My go-to varieties are Sedums (like Sedum clavatum), many Echeverias, Sempervivums (Hens and Chicks), and small trailing types like String of Pearls.
- Light Requirements: Ensure all the succulents you choose for one piece have similar light and water needs. This prevents one plant from suffering while another thrives.
- Size Variation: Use a mix of larger rosettes for focal points and smaller, filler succulents to tuck into tiny crevices. This creates depth and visual interest.
Specialized Potting Mix & Anchoring Materials
- Fast-Draining Soil: Standard potting soil is a death sentence here. You need a gritty, fast-draining mix. I use a blend of two parts cactus/succulent soil to one part perlite and one part small orchid bark or pumice.
- Sphagnum Moss: This is your secret weapon! A layer of moistened sphagnum moss in your planting pockets helps retain just enough moisture for the roots to establish without causing rot.
- Strong Adhesive: A waterproof, clear-drying craft glue or a specialty plant adhesive (like Oasis Floral Glue) is essential for securing plants and moss in tricky spots.
- Florist Pins or Thin Wire: For larger plants or sections, you may need to gently use a U-shaped florist pin or thin, green-coated wire to hold a plant in place until its roots take hold.
Essential Tools
- A small trowel or spoon for adding soil mix.
- Tweezers or long-handled chopsticks for precise placement in tight spaces.
- A spray bottle for lightly misting the moss and roots during assembly.
- Protective gloves to keep your hands clean and safe from any sharp wood edges.
- A soft-bristled brush for gently dusting off excess soil from the finished display.
Having everything laid out on a newspaper-covered table before you start makes the creative process feel less like a chore and more like an artist setting up their palette.
Finding and Preparing Your Driftwood
Where to Source Driftwood
Finding the perfect piece of wood is like a treasure hunt, and I’ve found pieces everywhere from local beaches to my favorite online shops. Always check your local regulations before collecting wood from public beaches or parks, as many areas require permits or prohibit removal entirely. Your safest and most legal bets are craft stores, aquarium suppliers, or reputable online sellers who offer pre-cleaned and dried driftwood.
- Beaches & Rivers: Look for smooth, bleached pieces that have been weathered by water and sun. Avoid wood that feels soft, crumbly, or has a foul smell, as this indicates rot.
- Craft & Hobby Stores: This is my go-to for a quick, guaranteed-clean start. The wood is usually dry, pest-free, and ready for minor prep work.
- Online Retailers: A fantastic resource for specific shapes and sizes. Read reviews to ensure the seller provides clean, quality wood.
No matter where you get it, your final piece must be bone-dry and free of any insects, salt, or decaying material. Starting with a clean, stable base is the single most important step for long-term success.
Step-by-Step Driftwood Preparation
I never skip this cleaning ritual – it prevents mold and nasty pests from harming my plants later on. You’ll need a scrub brush, a large bucket or basin, and some regular household bleach. This is a key step in my complete guide to getting rid of mold and fungus in succulents. Follow along for more tips on cleaning, prevention, and healthy plant care.
- Scrub & Rinse: First, I take my driftwood outside and give it a vigorous scrub with a stiff brush under running water. This removes all the loose dirt, sand, and any tiny critters.
- Sterilize with Soak: Next, I submerge the wood completely in a solution of one part bleach to nine parts water. Let it soak for at least 24 hours. This bath kills any lingering mold spores, bacteria, or insect eggs.
- Dry Completely: After the bleach soak, rinse the wood thoroughly and let it bake in the sun for several days until it’s completely dry. You’ll know it’s ready when it feels lightweight and makes a hollow sound if you tap it. Any trapped moisture will cause the wood to rot over time.
The Step-by-Step Mounting Process
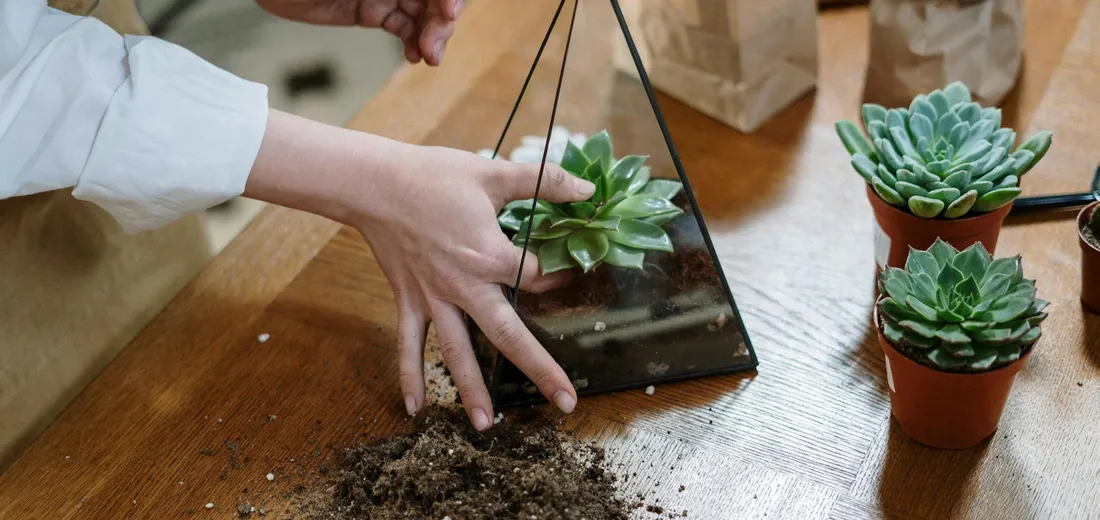
Creating a Secure Base with Moss and Soil
This step is where your living sculpture really takes shape. You’re building tiny planters directly onto the wood. I use a mix of long-fiber sphagnum moss and a gritty succulent soil-about a 50/50 blend works perfectly for me.
- Soak a handful of sphagnum moss in water and then wring it out so it’s just damp.
- Take small clumps and press them into natural crevices, knots, or hollows on your driftwood to form little pockets.
- Pack your succulent soil mix firmly on top of the moss in each pocket. The moss acts like a sponge, holding just enough moisture for the roots without keeping them wet.
Think about your final arrangement as you build these bases. Create a few different-sized pockets to give your design visual interest and depth.
Anchoring Your Succulents Firmly
Now for the fun part-attaching the plants! I always use cuttings that I’ve allowed to callous over for a few days, as their fresh roots will grip the soil and wood more effectively than a pre-potted plant.
- Prepare Cuttings: Let the cut end of your succulent stem or leaf dry out and form a scab (callous) for 2-3 days. This prevents it from absorbing too much water and rotting.
- Position for Balance: Before any glue comes out, play with the layout. Place your cuttings on their soil pockets, thinking about color, texture, and how the arrangement will look from all sides.
- Secure the Plants: Once you’re happy, use a dab of waterproof craft glue or a clear, plant-safe epoxy on the calloused stem end and press it into the soil pocket. For very small cuttings, I sometimes use U-shaped floral pins to hold them in place until their roots take over. Let the glue set completely before moving your creation.
Don’t water your new succulent driftwood for at least a week. This gives the roots time to heal and start seeking out moisture on their own. When propagating succulent cuttings, water sparingly and only after the medium dries a bit. This helps roots establish without rot. Using tweezers can be a huge help for precisely placing tiny plants and securing them with pins.
Caring for Your New Driftwood Succulent Garden
Mastering Watering and Light
Watering a vertical garden is completely different from watering a pot. I’ve found that a heavy pour will just run straight down, leaving the roots high and dry. Instead, I use a spray bottle set to a fine mist and gently spray the moss and the base of each plant until everything is evenly damp, never soggy.
I always check if my plants need water by touching the moss. If it feels dry and crumbly, it’s time for a drink. This misting method mimics a light, natural rain and encourages the roots to seek out moisture without drowning them. In my warm, dry living room, I mist about once a week, but you should adjust based on your home’s humidity.
Finding the right light is your other key to success. Place your driftwood masterpiece in a spot that gets plenty of strong, indirect light, like near an east or west-facing window. The gentle morning or late afternoon sun is perfect. I learned the hard way that harsh, direct midday sun can scorch the leaves, leaving permanent brown marks.
Quick Tip: Rotate your driftwood every few weeks so all sides of your succulents get equal light and grow evenly, preventing them from leaning awkwardly toward the window.
Ensuring Long-Term Health and Durability
Good air circulation is the secret weapon for a healthy driftwood garden. Stagnant, still air can encourage mold and rot, especially in the damp sphagnum moss. I make sure my creation isn’t shoved into a cramped corner and that a ceiling fan or gentle air vent keeps the air moving around it.
Your succulents will get most of what they need from the fresh air and water, but a little food helps. I use a diluted, balanced liquid fertilizer only during the active growing season in spring and summer, and I apply it just once a month at most. Over-fertilizing will cause weak, leggy growth, which is the last thing you want on a vertical display. For more details on the timing and method, check out our guide on fertilizing succulents for maximum growth.
Keep a gentle eye on your plants. After a few weeks, you should see new, tiny roots anchoring into the moss and wood. Check the undersides of leaves occasionally for common pests like mealybugs, which look like tiny bits of white fluff. If you spot any, a quick dab with a cotton swab dipped in rubbing alcohol takes care of them immediately.
Troubleshooting Common Problems
Don’t panic if a plant falls off! This happens, especially when the roots haven’t fully established. If a succulent takes a tumble, simply re-wrap it with fresh, damp moss and a new piece of fishing line, securing it a little tighter this time. The plant is usually fine and will try to re-root. This is a perfect moment to practice saving a broken succulent. With gentle support and patience, it will often recover and re-root successfully.
Yellow, translucent, or mushy leaves are a classic sign you’re being too generous with water. When you see yellowing, stop misting immediately and let the entire piece dry out completely. You might need to increase air circulation around it. In severe cases, you may have to un-wire the affected plant, trim any black, rotten roots, and reattach it after it calluses over for a day or two.
On the flip side, if the leaves look wrinkled, thin, and shriveled, your garden is too dry. Sometimes wrinkled leaves also feel soft or squishy, which can signal overwatering or root problems instead of drought. Shriveling means your succulents are using up their internal water reserves and need a good misting. If you notice that, inspect the roots and let the soil dry out a bit before the next watering. Give them a thorough drink, and the leaves should plump back up within a day or two, ready for their next close-up.
Quick Tip: A droopy plant that’s still green might just be loose. Before you water, gently press it against the driftwood to see if it wiggles; if it does, it just needs a tighter secure wrap.
Design Ideas for a Stunning Display
Think of your driftwood as a living sculpture, a tiny piece of natural art for your home. I love treating each piece as a unique canvas, where the succulents become the paint. Over the years, I’ve found that a little planning before you start gluing makes all the difference in creating a display that takes your breath away.
Playing with Color Combinations
Color is the first thing your eye notices, so use it to tell a story. I often group succulents with similar color families for a sophisticated, monochromatic look. You can also introduce colorful succulent varieties in pink, blue, and purple to liven the palette.
- Sunset Tones: Combine the fiery red tips of a Crassula capitella ‘Campfire’ with the soft orange hues of a Graptosedum ‘California Sunset’ and the purple-blues of an Echeveria ‘Perle von Nurnberg’. This creates a stunning, warm gradient that looks like a permanent sunset.
- Cool and Collected: For a serene, cool-toned arrangement, pair the powdery blue of a Echeveria ‘Blue Atoll’ with the silvery-green of a Senecio serpens (Blue Chalk Sticks) and the deep, almost black, color of an Echeveria ‘Black Prince’.
- Vibrant Pops: Don’t be afraid to add a splash of bright color! A single, neon-green Sedum japonicum ‘Tokyo Sun’ or a pink-tipped Graptopetalum can become the cheerful focal point of your entire piece.
Quick Tip: Place your brightest, most colorful succulent slightly off-center for a more dynamic and naturally appealing look. This works especially well when creating a stunning display of rare colorful succulents. Pair bold hues with contrasting textures to make the collection pop.
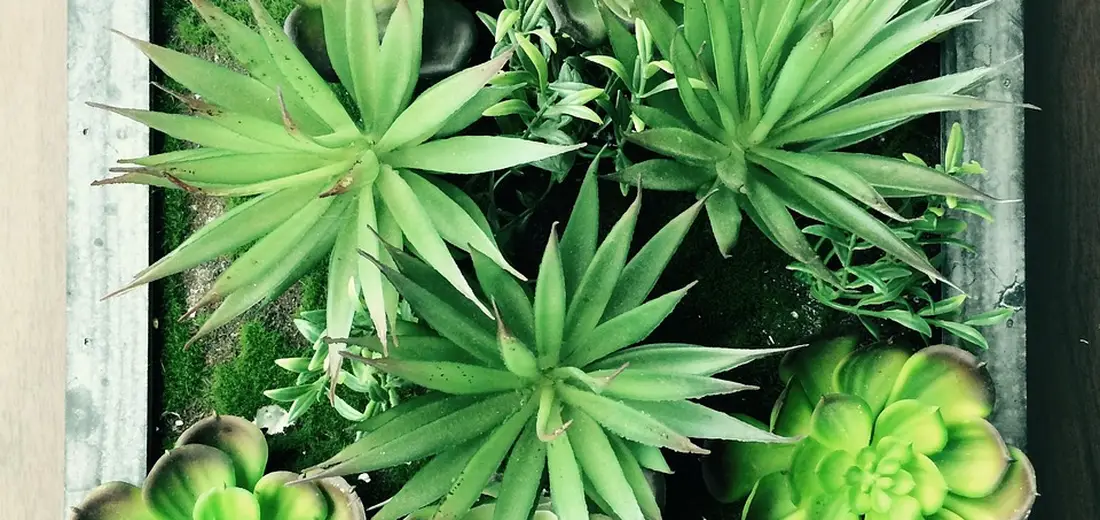
Creating Texture Contrast
This is my secret weapon for making an arrangement truly captivating. The goal is to mix different leaf shapes and surfaces so they play off each other.
- Spiky and Round: I adore the contrast between the sharp, architectural spikes of a Haworthia or Aloe and the soft, plump rosettes of an Echeveria. It adds a fantastic visual tension.
- Trailing and Upright: Use the natural form of the driftwood to your advantage. Plant upright, rosette-forming succulents on the top or in crevices, and let trailing varieties like String of Pearls or Sedum morganianum spill over the edges. This mimics how plants grow in nature and adds movement.
- Smooth and Ruffled: Pair succulents with smooth, waxy leaves (like many Graptopetalum) with ones that have ruffled, crinkled edges (like an Echeveria shaviana or ‘Topsy Turvy’). The difference in light reflection makes the whole piece shimmer.
Running your fingers over the different textures is part of the joy of owning one of these creations.
Building a Miniature Terrarium Landscape
You can transform your driftwood into a tiny, magical world. The key is to think about scale and create different levels.
- Establish a Focal Point: Choose one larger, statement succulent to act as your “tree” or centerpiece. A large Echeveria or a beautifully shaped Aeonium works perfectly for this role.
- Add the Understory: Surround your focal point with smaller, ground-cover type succulents. I use a lot of Sedum clavatum or Graptopetalum paraguayense (Ghost Plant) for this, as they spread nicely and fill in spaces.
- Incorporate Non-Plant Elements: This is where the real magic happens. Tuck small pieces of moss into damp, shaded crevices to create “forest floors.” Press tiny, colorful stones or coarse sand around the base of plants to look like pathways or dry riverbeds.
I once added a miniature ceramic fairy door leaning against the driftwood, and it completely brought the scene to life. The most successful landscapes tell a little story and invite you to look closer.
Quick Tip: Always leave a little empty space between your succulents. They need room to grow and breathe, and the negative space makes the overall design feel more intentional and less crowded. It’s also important to prune your succulents correctly to maintain their health and aesthetics.
Common Questions
How long does a succulent driftwood display typically last?
With proper care, your living sculpture can thrive for many years as the succulents root into the wood and moss.
Can I use hot glue to attach the succulents?
It is not recommended, as the high heat can damage plant tissues; a cool-setting, waterproof craft or floral glue is a safer alternative.
How do I know when the moss needs water?
Check the moss by touch and mist it thoroughly with a spray bottle only when it feels dry and crumbly to the touch.
What should I do if I see pests on my driftwood arrangement?
Immediately dab any pests like mealybugs with a cotton swab dipped in rubbing alcohol to eliminate them.
Why are the roots not attaching to the driftwood?
This is often due to underwatering or insufficient contact; ensure the moss remains slightly damp and the plant is firmly secured to encourage root growth.
Do I need to bring my driftwood succulent inside during winter?
Yes, you should bring it indoors if you experience frost, as most popular succulents are not cold-hardy and can be damaged by freezing temperatures. For those hoping to overwinter outdoors, understanding cold hardiness and proper protection is essential, and some varieties can survive winter outdoors with mulching and shelter.
Bring Your Driftwood Succulent Creation to Life
Growing beautiful succulents on driftwood comes down to choosing the right porous wood, using a well-draining soil mix, and giving your plants plenty of bright, indirect light. From my own projects, the most critical steps are:
- Securely attaching plants with moss and fishing line
- Watering deeply but infrequently to mimic their natural habitat
- Rotating the display for even sun exposure
I hope you feel inspired to gather your materials and start crafting-with these simple steps, you can confidently create a stunning, living piece of art that brings joy for years.
Further Reading & Sources
- DIY Driftwood Planter Filled with Succulents | Succulents and Sunshine
- How to Create a DIY Succulent Driftwood Planter – The Design Twins
- How to Make a Driftwood Succulent Planter – Ted Lare – Design & Build
- 3 Ways To Attach Succulents To Driftwood To Get Them To Grow
Lena Greenfield is a passionate horticulturist and plant care expert with over 10 years of experience cultivating and nurturing hardy house plants. With a deep understanding of both indoor and outdoor gardening, Lena shares practical advice on choosing, caring for, and maintaining resilient plants that flourish year-round. Through her knowledge and hands-on approach, Lena helps plant lovers transform their spaces into vibrant, green sanctuaries, no matter their gardening experience.
DIY Projects